CounterBalance Bracket Installation
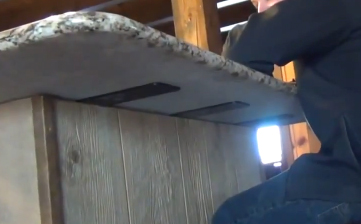
Installing our CounterBalance brackets isn’t as challenging as you might think. We designed this product to not only offer superior countertop support, but to also be simple to install and enjoy. This article will illustrate just how simple an overhang installation with CounterBalance is and will likewise outline the steps to follow for a successful project using the COUNTERPLATE. This guide is for a 12” overhang addition, but if you would like additional instructions for our other CounterBalance installations, feel free to contact us.
What you will need:
Installation:
1. Place your COUNTERPLATES no more than 16-20” apart for optimum performance. Make sure to leave ½” of wood stud wall. Trace the shape into the stud wall.
2. Use a router with a ¼” bit to cut out your tracing. Test fit the bracket to ensure it is both snug and level. The bracket needs to both be level with your counter and also with the stud wall.

3. Once the COUNTERPLATE is level, drill pilot holes. Place the COUNTERPLATE back into position and attach with the provided screws. Repeat for each COUNTERPLATE.
4. Properly place the countertop from the opposite side of stud wall or front of cabinet. DO NOT SET TOPS DIRECTLY ON PLATE OR BRACKET.

5. Lift the countertop and apply Bondaflex #100 or Chem-set™ RTV 4500 to the brackets. Slide the countertop back into place.

Following these five simple steps will allow you to avoid sore knees and the expensive corbels that our competitors offer. If you’d like to see a demonstration, we’ve put this video together for you. Also included below is additional materials about our CounterBalance line.
CounterBalance Installation Instructions


